
Mastering Drum Timing in Pro Tools: A Step-by-Step Guide
Blog post description.
Mastering Drum Timing in Pro Tools: A Step-by-Step Guide 🥁
Are your drum tracks falling out of sync when you adjust your tempo in Pro Tools? Don't worry—you're not alone! Whether you're working with acoustic drum tracks or sample loops, ensuring they stay perfectly aligned with your session's grid can be a challenge. This guide will show you how to fix drum timing in Pro Tools like a pro, keeping your rhythm on point no matter the tempo. Let's dive in! 🎶
Understanding the Basics of Drum Timing in Pro Tools
When working with audio files like drum tracks, changing the tempo in Pro Tools doesn't automatically adjust the timing of your tracks. Instead, the grid changes, while your drums remain in their original position—resulting in mismatched beats and a messy session. This happens because audio tracks need specific settings to adapt to tempo changes.
In this tutorial, we'll walk you through the process of aligning your drum tracks with the grid, ensuring they stay in sync with your project's metronome for a polished and professional sound.
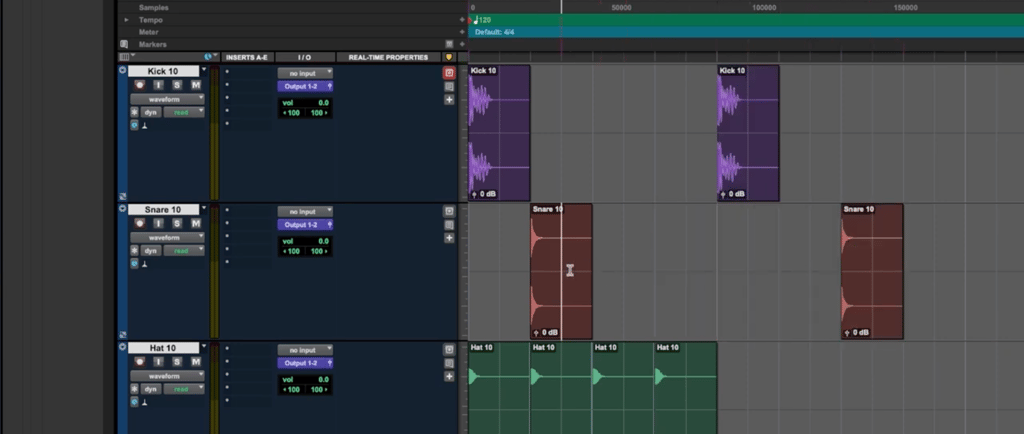
Step 1: Setting Your Tracks to Rhythm Mode
The first step in fixing drum timing is enabling Rhythm mode for your drum tracks. This is how you do it:
Locate the track settings in Pro Tools. If you don’t see the full options panel, adjust the track size to “Large” by clicking the line between two tracks and dragging downward.
Under the track settings, switch each drum track (e.g., kick, snare, hi-hat) to Rhythm mode. This tells Pro Tools that these tracks need to align with the session's grid.
At this point, you might notice that changing the tempo still doesn't move your audio tracks. That's because there's one more critical step to complete!
watch video here: https://youtu.be/tNsy8a0wDoU
Step 2: Switching to Tick Mode
Audio tracks in Pro Tools default to “Sample” mode, which keeps their timing fixed regardless of tempo changes. To make your drum tracks respond to tempo adjustments, you need to switch them to Tick mode:
Locate the blue dot under each track, which indicates it's in “Sample” mode.
Click the dot and switch it to Tick mode. The track indicator will turn green, signaling the change.
Repeat this process for all drum tracks, including the kick, snare, and hi-hat.
Once your tracks are in Tick mode, they'll adjust their timing in sync with any tempo changes made to your session. Let's test it out!
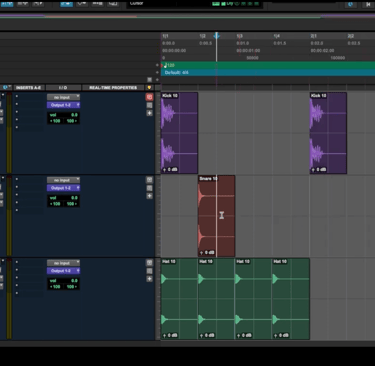
Step 3: Testing Your Adjustments
Now that you've set your tracks to Rhythm and Tick modes, it's time to see the magic in action:
Change the session tempo (e.g., from 120 BPM to 140 BPM) and observe how the drum tracks align with the grid.
Play the session with the metronome turned on. You'll notice that the drums stay perfectly in sync with the click track, even at the new tempo.
Experiment with different tempos—faster, slower, or even extreme speeds like 250 BPM or 400 BPM. The drums will remain tightly locked to the grid and metronome!
With these adjustments, you've successfully synchronized your drum tracks with the session tempo. Whether you're speeding up a song for an energetic vibe or slowing it down for a more relaxed feel, your tracks will stay in perfect timing.
Key Takeaways for Perfect Drum Timing
Here's a quick recap of the steps to fix drum timing in Pro Tools:
Enable Rhythm mode: Ensure all drum tracks are set to Rhythm mode to align them with the session grid.
Switch to Tick mode: Convert tracks from Sample to Tick mode so they respond to tempo changes.
Test with the metronome: Adjust the tempo and verify alignment with the click track to ensure everything stays in time.
By following these steps, you'll maintain tight, professional-sounding drum tracks that adapt seamlessly to any tempo adjustments.
Conclusion: Take Your Drum Tracks to the Next Level
Fixing drum timing in Pro Tools doesn't have to be a headache. By mastering Rhythm and Tick modes, you can take full control of your drum tracks, ensuring they stay perfectly aligned with your session grid no matter the tempo. Whether you're producing a track for fun or working on a professional mix, these skills will elevate your production quality.
Ready to try it out? Share your experience in the comments below, and let us know how these tips helped your workflow. Don't forget to explore more Pro Tools tutorials to continue refining your craft. Let's create amazing music together! 🌟